How To Delete Instagram Picture From Multiple
How to delete instagram picture from airplane, how to delete instagram pictures on laptop, how to delete instagram pictures, how to delete instagram pictures on computer, how to delete instagram account on computer, how to delete a page in word, how to get free robux,
Do you ever find yourself wanting to clear out your Instagram feed? Maybe you've posted too many photos, or perhaps you're just ready for a fresh start. Whatever the reason, knowing how to delete multiple Instagram photos can save you time and frustration. In this article, we'll walk you through the quick and easy process of deleting multiple photos on Instagram.
Step 1: Open Instagram and Go to Your Profile
The first step is to open the Instagram app on your smartphone and go to your profile. You can do this by tapping the profile icon in the bottom right-hand corner of the screen.

Once you're on your profile, you'll see all the photos and videos you've posted on Instagram in a grid format. You'll notice that each photo has three icons in the bottom-right corner: a heart, a comment bubble, and a bookmark.
Step 2: Select the Photos You Want to Delete
Now that you're on your profile, select the photos you'd like to delete. To do this, tap and hold on a photo until a checkmark appears in the top-right corner of the photo.

You can select multiple photos by tapping on each photo individually or by swiping your finger across the photos you want to delete. You'll know which photos you've selected because they'll have a white checkmark in the top-right corner.
Step 3: Delete the Selected Photos
Once you've selected all the photos you want to delete, tap on the three dots in the top-right corner of the screen. This will bring up a list of options, including "Archive," "Edit," and "Delete."

Tap on "Delete" and confirm that you want to delete the selected photos. You'll notice that the photos you've deleted will no longer appear on your profile.
Conclusion
Deleting multiple photos on Instagram is an easy and simple process that can save you time and frustration. Whether you're looking to clean up your profile or start fresh, knowing how to delete multiple photos can come in handy. Just remember to select the photos you want to delete, tap on the three dots, and confirm that you want to delete the selected photos. With these steps, you'll have a clean and organized Instagram profile in no time!
Also read:
.How To Clear Cache In Ios React Native
How to clean cache in react native, how to clear react cache, how to clear cache in react js, ios clear app cache, how to clear cache in edge browser, how to clear cache pc, how to clear cookies, how to draw, how to screenshot on pc,
Clearing the cache is an often-overlooked task that is crucial for optimal website performance. If you are using SiteGround hosting, it is important that you clear SiteGround cache in the right way.
The Importance of Clearing Cache
Cache is essential for faster website loading. It stores frequently used data in the browser so that the website does not have to fetch fresh data every time a user visits it. This speeds up the page loading time and decreases the server load.
However, cache can also cause issues such as outdated content, broken functionalities, and errors that affect the user experience. This is why it is necessary to regularly clear cache to maintain website performance and avoid issues.
Clearing SiteGround Cache
SiteGround has its own caching system that can be beneficial for website optimization. However, it is important to clear SiteGround cache regularly to ensure that your website is running efficiently and that changes to your website are being reflected.
There are several ways to clear SiteGround cache:
1. Clearing SiteGround Dynamic Cache
SiteGround's dynamic cache is a powerful caching system that stores the dynamic content of your website, such as PHP and MySQL queries. To clear SiteGround dynamic cache, follow these steps:
- Login to your SiteGround cPanel account.
- Go to the 'Site Improvement Tools' section and select 'SuperCacher'.
- Click on the 'Dynamic Cache' tab.
- Click on the 'Flush Cache' button.
2. Clearing SiteGround Memcached Cache
Memcached is a caching system used by SiteGround to store data in memory for faster access. To clear SiteGround Memcached cache, follow these steps:
- Login to your SiteGround cPanel account.
- Go to the 'Site Improvement Tools' section and select 'SuperCacher'.
- Click on the 'Memcached' tab.
- Click on the 'Flush Cache' button.
3. Clearing SiteGround Static Cache
SiteGround's static cache stores the static content of your website, such as CSS, images, and JavaScript. To clear SiteGround static cache, follow these steps:
- Login to your SiteGround cPanel account.
- Go to the 'Site Improvement Tools' section and select 'SuperCacher'.
- Click on the 'Static Cache' tab.
- Click on the 'Flush Cache' button.
Conclusion
Clearing SiteGround cache is an important task that should be done regularly to ensure that your website is running efficiently and that changes to your website are being reflected. By following the steps outlined above, you can ensure that your website is performing at its best.
Remember, cache is important for optimizing website performance, but it can also cause issues if not cleared regularly. By clearing SiteGround cache, you can maintain website speed, avoid errors, and provide a seamless user experience.
Also read:
.How To Use Chat Gpt Ux
How to use chat gpt to write an essay, how to use chat gpt open ai, how to use chat gpt open ai, how to use chat gpt without phone number, how to use a bidet, how to use zoom, how to tie a tie, how to get free robux, how to pronounce,
As technology continues to advance, we are constantly seeing new revolutionary developments that have the potential to change the way we live our daily lives. One of the most promising technologies that we have seen in recent years is GPT-3, and its ability to revolutionize the way we interact with artificial intelligence.
GPT-3 and its Implications for the Future
GPT-3, or the third iteration of the Generative Pre-trained Transformer, is a deep learning algorithm that has taken the tech industry by storm. Developed by OpenAI, GPT-3 has the capability to generate human-like text, allowing it to perform tasks that were previously thought impossible for AI to accomplish.
At its core, GPT-3 is a language processing model that has been trained on massive amounts of data, allowing it to understand and respond to the nuances of human language. This means that it can perform a range of tasks, from answering customer service inquiries to writing entire articles.
The implications of this technology are vast, and we are only beginning to scratch the surface of what it can do. Here are just a few of the ways that GPT-3 could impact the world in the coming years:
Automating Content Creation
One of the most exciting applications of GPT-3 is in its ability to automate content creation. With the ability to generate human-like text, GPT-3 could potentially replace human writers in a variety of industries.
For example, news organizations could use GPT-3 to write news articles in real time, providing up-to-the-minute coverage of breaking events. E-commerce companies could use the technology to automatically generate product descriptions and marketing copy, freeing up employees to focus on other tasks.
While there are certainly concerns about the potential loss of jobs, the efficiency gains that this technology could provide are hard to ignore. As machines become increasingly capable of performing human tasks, it will become increasingly important for us to find new ways of working alongside them.
Improving Customer Service
Another area where GPT-3 could have a big impact is in customer service. With the ability to analyze and respond to customer inquiries in real-time, GPT-3 could be used to create highly personalized customer service experiences.
Imagine a world where customers could interact with a chatbot that not only understands their inquiry but can also respond in a way that feels natural and conversational. This type of customer service could drastically improve customer satisfaction and could lead to increased customer loyalty.
Enhancing Educational Material
GPT-3 could also be used to enhance educational material in a variety of ways. For example, it could be used to automatically generate course content, providing students with a more personalized learning experience.
Additionally, GPT-3 could be used to analyze student writing and provide instant feedback, helping to identify areas where students need to improve. This type of instant feedback could be a game-changer in the way we approach education, allowing students to learn faster and more efficiently than ever before.
Conclusion
As we look towards the future, it's clear that GPT-3 has the potential to revolutionize the way we interact with artificial intelligence. From automating content creation to enhancing educational material, the possibilities are truly endless.
While there are certainly concerns about the role of AI in our society, it's important to remember that these technologies are still in their infancy. As we continue to develop and refine these tools, we will undoubtedly find new and exciting ways to work alongside them, creating a brighter and more prosperous future for all.

Image Source: OpenAI
Also read:
.Caller Id On Fios Tv
How to get caller id on fios tv screen, how to display caller id on fios tv, how to get caller id on fios tv, how to set up caller id on fios, no caller id on cell phone, turn off caller id on iphone, caller id on tv screen, no caller id on cell phone, caller id app, caller id box,
As Asian people, we value our privacy and security, especially when it comes to our personal phone calls. That's why we need to know how to block our caller ID, and luckily, there are many ways to do that.
How to Block Caller ID

One way to block your caller ID is to use your phone's settings. Most phones have an option to disable caller ID, which means that no one will see your phone number when you call them. You can turn off caller ID by going to your phone's settings, selecting "Phone," then "Show My Caller ID," and toggling the switch to the off position. This will block your caller ID for all calls you make from your phone.
Using maxTV Caller ID

If you have SaskTel's maxTV service, you can use their advanced caller ID feature to identify who's calling you before you answer the phone. This feature displays the caller's name and phone number on your TV screen so you can decide whether to answer the call or not. To use maxTV caller ID, you need a maxTV set-top box and an HD TV with an HDMI cable.
Caller ID on TV Support

Another way to use caller ID on your TV is through Armstrong's TV service. Their caller ID feature allows you to see who's calling you on your TV screen while you're watching your favorite shows. This feature can be particularly helpful if you're expecting an important call but don't want to interrupt your viewing. To use Armstrong's TV caller ID, you need an HD TV with an HDMI cable and a set-top box from Armstrong.
Fios Caller Id On Computer

If you're a Verizon Fios customer, you can use their enhanced caller ID service on your computer to see who's calling you before you answer the phone. This feature displays the caller's name and phone number on your computer screen, and it even shows you the time and date of the call. To use Fios caller ID on your computer, you need to download the Fios app and sign in with your Verizon account.
As you can see, there are many ways to block your caller ID or use advanced caller ID features to identify who's calling you. Whether you prefer to block your caller ID altogether or just want to see who's calling you without interrupting your TV viewing or computer work, there's a solution for you. Just choose the option that works best for your needs and enjoy the peace of mind that comes with knowing who's on the other end of the line.
Caller maxtv using sasktel support ll call log history. Fios caller id on computer fios smile citrus the caller id on their. Caller id on tv follow the wire. Caller id for android apk download. Fios caller id on computer fios smile citrus the caller id on their. Caller id for uverse voice and tv at&t uverse tv support. Caller id on tv support armstrong
If you are searching about Fios caller id on computer fios smile citrus the caller id on their, you've came to the right page. We have pictures like Fios caller id on computer fios smile citrus the caller id on their, the ultimate phone gadgets caller id, internet call waiting, telezapper, fios caller id on computer fios smile citrus the caller id on their. Here it is:
How to block caller id, how to hide your caller id when making a phone call on iphone
Also read:
.How To Add Your Real Signature In Word
How to add your real signature in the cell, how to add your real signature maker, how to add your real signature baseball, how to add your real signature fonts, how to add your real life, how to add your business to google, how to add your music to spotify, how to add shortcut to chrome homepage, how to add signature to pdf, how to draw, how to lower blood pressure, how to get free robux,
Adding a signature to your word documents is a perfect way to personalize them and make them look more professional. Signatures can be used to indicate ownership, add contact details, or even just to give your documents a personal touch. With the many ways to add a signature in Word, you'll never have to worry about leaving your documents without one. Here's how to add a signature in Word:
1. Using the Signature Line Feature
The signature line feature is the most preferred way to add signatures to Word documents. With this feature, you can create a digital signature that looks similar to the traditional handwritten signature. Follow these steps to add a signature line:
- Click on the location where you want to add the signature line.
- Click on the "Insert" tab on the menu bar.
- Click on "Signature Line" in the "Text" group.
- Enter your preferred signature details in the fields displayed.
- Click on "OK" to add your signature line.
After the signature line is added, you can sign it by typing or drawing your signature using a touchscreen device or a mouse.
2. Creating a Signature Using the Drawing Tool
If you prefer a more personalized signature, you can create your signature using the drawing tool. Follow these steps:
- Click on "Insert" on the menu bar.
- Click on "Shapes" in the "Illustrations" group.
- Select a line or shape to use as your signature.
- Draw your signature using the selected shape or line.
- Format your signature in the "Shape Styles" group.
- Once you're satisfied with your signature, save it as a picture and then insert it where you want it to appear in your document.
3. Using a Scanned Image
If you have a scanned image of your signature, you can easily insert it into your word document. Follow these steps:
- Click on the location where you want your signature to appear.
- Click on the "Insert" tab on the menu bar.
- Click on "Pictures" in the "Illustrations" group.
- Select the scanned image of your signature and click on "Insert".
- You can resize the image and position it where you want it to appear in your document.
Adding a signature to your word document is a quick and easy process. You can choose to go for a digital signature, draw your signature using the drawing tool or use a scanned image of your signature.
Conclusion
Adding a signature to your word document is a great way to make your documents more personal and professional. With the many ways to add your signature, you can create a personalized signature that is unique to you. Try out any of the options above and take your documents to the next level.
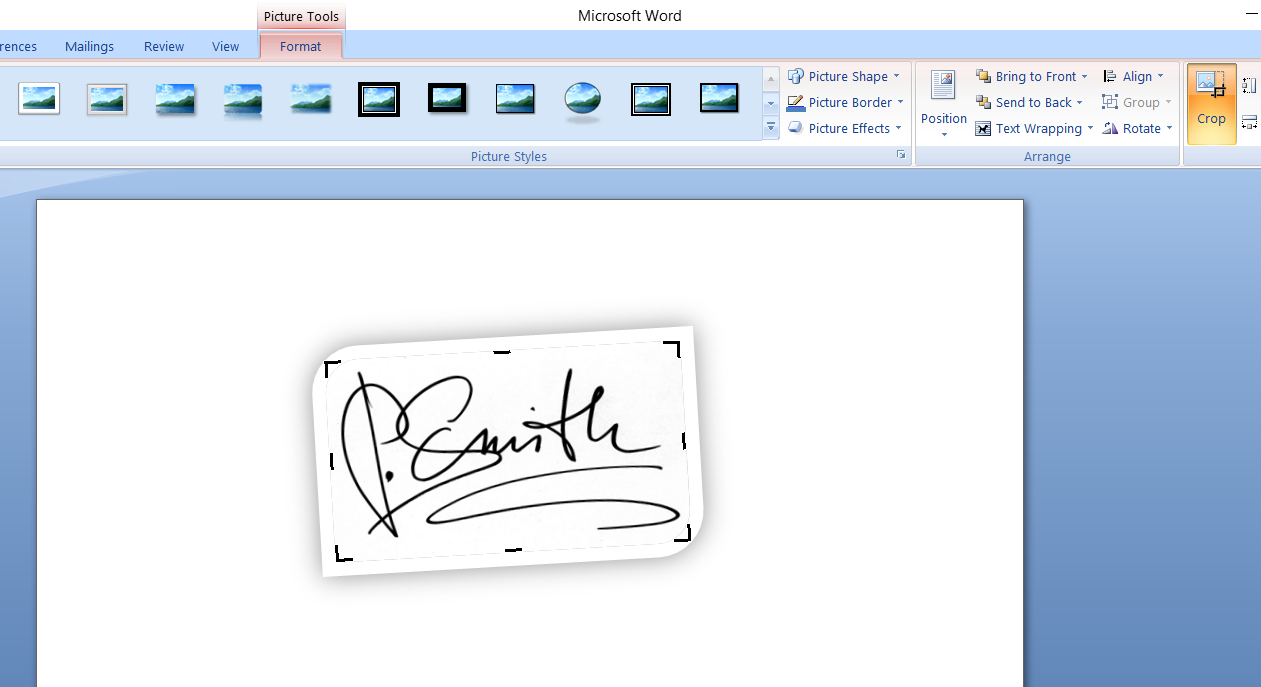
Image source: alivetalk.com
Also read:
.How To Delete Instagram Picture From Multiple
How to delete instagram picture from airplane, how to delete instagram pictures on laptop, how to delete instagram pictures, how to delete i...
