How to delete instagram picture from airplane, how to delete instagram pictures on laptop, how to delete instagram pictures, how to delete instagram pictures on computer, how to delete instagram account on computer, how to delete a page in word, how to get free robux,
Do you ever find yourself wanting to clear out your Instagram feed? Maybe you've posted too many photos, or perhaps you're just ready for a fresh start. Whatever the reason, knowing how to delete multiple Instagram photos can save you time and frustration. In this article, we'll walk you through the quick and easy process of deleting multiple photos on Instagram.
Step 1: Open Instagram and Go to Your Profile
The first step is to open the Instagram app on your smartphone and go to your profile. You can do this by tapping the profile icon in the bottom right-hand corner of the screen.

Once you're on your profile, you'll see all the photos and videos you've posted on Instagram in a grid format. You'll notice that each photo has three icons in the bottom-right corner: a heart, a comment bubble, and a bookmark.
Step 2: Select the Photos You Want to Delete
Now that you're on your profile, select the photos you'd like to delete. To do this, tap and hold on a photo until a checkmark appears in the top-right corner of the photo.

You can select multiple photos by tapping on each photo individually or by swiping your finger across the photos you want to delete. You'll know which photos you've selected because they'll have a white checkmark in the top-right corner.
Step 3: Delete the Selected Photos
Once you've selected all the photos you want to delete, tap on the three dots in the top-right corner of the screen. This will bring up a list of options, including "Archive," "Edit," and "Delete."

Tap on "Delete" and confirm that you want to delete the selected photos. You'll notice that the photos you've deleted will no longer appear on your profile.
Conclusion
Deleting multiple photos on Instagram is an easy and simple process that can save you time and frustration. Whether you're looking to clean up your profile or start fresh, knowing how to delete multiple photos can come in handy. Just remember to select the photos you want to delete, tap on the three dots, and confirm that you want to delete the selected photos. With these steps, you'll have a clean and organized Instagram profile in no time!
Also read:
.How to clean cache in react native, how to clear react cache, how to clear cache in react js, ios clear app cache, how to clear cache in edge browser, how to clear cache pc, how to clear cookies, how to draw, how to screenshot on pc,
Clearing the cache is an often-overlooked task that is crucial for optimal website performance. If you are using SiteGround hosting, it is important that you clear SiteGround cache in the right way.
The Importance of Clearing Cache
Cache is essential for faster website loading. It stores frequently used data in the browser so that the website does not have to fetch fresh data every time a user visits it. This speeds up the page loading time and decreases the server load.
However, cache can also cause issues such as outdated content, broken functionalities, and errors that affect the user experience. This is why it is necessary to regularly clear cache to maintain website performance and avoid issues.
Clearing SiteGround Cache
SiteGround has its own caching system that can be beneficial for website optimization. However, it is important to clear SiteGround cache regularly to ensure that your website is running efficiently and that changes to your website are being reflected.
There are several ways to clear SiteGround cache:
1. Clearing SiteGround Dynamic Cache
SiteGround's dynamic cache is a powerful caching system that stores the dynamic content of your website, such as PHP and MySQL queries. To clear SiteGround dynamic cache, follow these steps:
- Login to your SiteGround cPanel account.
- Go to the 'Site Improvement Tools' section and select 'SuperCacher'.
- Click on the 'Dynamic Cache' tab.
- Click on the 'Flush Cache' button.
2. Clearing SiteGround Memcached Cache
Memcached is a caching system used by SiteGround to store data in memory for faster access. To clear SiteGround Memcached cache, follow these steps:
- Login to your SiteGround cPanel account.
- Go to the 'Site Improvement Tools' section and select 'SuperCacher'.
- Click on the 'Memcached' tab.
- Click on the 'Flush Cache' button.
3. Clearing SiteGround Static Cache
SiteGround's static cache stores the static content of your website, such as CSS, images, and JavaScript. To clear SiteGround static cache, follow these steps:
- Login to your SiteGround cPanel account.
- Go to the 'Site Improvement Tools' section and select 'SuperCacher'.
- Click on the 'Static Cache' tab.
- Click on the 'Flush Cache' button.
Conclusion
Clearing SiteGround cache is an important task that should be done regularly to ensure that your website is running efficiently and that changes to your website are being reflected. By following the steps outlined above, you can ensure that your website is performing at its best.
Remember, cache is important for optimizing website performance, but it can also cause issues if not cleared regularly. By clearing SiteGround cache, you can maintain website speed, avoid errors, and provide a seamless user experience.
Also read:
.How to use chat gpt to write an essay, how to use chat gpt open ai, how to use chat gpt open ai, how to use chat gpt without phone number, how to use a bidet, how to use zoom, how to tie a tie, how to get free robux, how to pronounce,
As technology continues to advance, we are constantly seeing new revolutionary developments that have the potential to change the way we live our daily lives. One of the most promising technologies that we have seen in recent years is GPT-3, and its ability to revolutionize the way we interact with artificial intelligence.
GPT-3 and its Implications for the Future
GPT-3, or the third iteration of the Generative Pre-trained Transformer, is a deep learning algorithm that has taken the tech industry by storm. Developed by OpenAI, GPT-3 has the capability to generate human-like text, allowing it to perform tasks that were previously thought impossible for AI to accomplish.
At its core, GPT-3 is a language processing model that has been trained on massive amounts of data, allowing it to understand and respond to the nuances of human language. This means that it can perform a range of tasks, from answering customer service inquiries to writing entire articles.
The implications of this technology are vast, and we are only beginning to scratch the surface of what it can do. Here are just a few of the ways that GPT-3 could impact the world in the coming years:
Automating Content Creation
One of the most exciting applications of GPT-3 is in its ability to automate content creation. With the ability to generate human-like text, GPT-3 could potentially replace human writers in a variety of industries.
For example, news organizations could use GPT-3 to write news articles in real time, providing up-to-the-minute coverage of breaking events. E-commerce companies could use the technology to automatically generate product descriptions and marketing copy, freeing up employees to focus on other tasks.
While there are certainly concerns about the potential loss of jobs, the efficiency gains that this technology could provide are hard to ignore. As machines become increasingly capable of performing human tasks, it will become increasingly important for us to find new ways of working alongside them.
Improving Customer Service
Another area where GPT-3 could have a big impact is in customer service. With the ability to analyze and respond to customer inquiries in real-time, GPT-3 could be used to create highly personalized customer service experiences.
Imagine a world where customers could interact with a chatbot that not only understands their inquiry but can also respond in a way that feels natural and conversational. This type of customer service could drastically improve customer satisfaction and could lead to increased customer loyalty.
Enhancing Educational Material
GPT-3 could also be used to enhance educational material in a variety of ways. For example, it could be used to automatically generate course content, providing students with a more personalized learning experience.
Additionally, GPT-3 could be used to analyze student writing and provide instant feedback, helping to identify areas where students need to improve. This type of instant feedback could be a game-changer in the way we approach education, allowing students to learn faster and more efficiently than ever before.
Conclusion
As we look towards the future, it's clear that GPT-3 has the potential to revolutionize the way we interact with artificial intelligence. From automating content creation to enhancing educational material, the possibilities are truly endless.
While there are certainly concerns about the role of AI in our society, it's important to remember that these technologies are still in their infancy. As we continue to develop and refine these tools, we will undoubtedly find new and exciting ways to work alongside them, creating a brighter and more prosperous future for all.

Image Source: OpenAI
Also read:
.How to get caller id on fios tv screen, how to display caller id on fios tv, how to get caller id on fios tv, how to set up caller id on fios, no caller id on cell phone, turn off caller id on iphone, caller id on tv screen, no caller id on cell phone, caller id app, caller id box,
As Asian people, we value our privacy and security, especially when it comes to our personal phone calls. That's why we need to know how to block our caller ID, and luckily, there are many ways to do that.
How to Block Caller ID

One way to block your caller ID is to use your phone's settings. Most phones have an option to disable caller ID, which means that no one will see your phone number when you call them. You can turn off caller ID by going to your phone's settings, selecting "Phone," then "Show My Caller ID," and toggling the switch to the off position. This will block your caller ID for all calls you make from your phone.
Using maxTV Caller ID

If you have SaskTel's maxTV service, you can use their advanced caller ID feature to identify who's calling you before you answer the phone. This feature displays the caller's name and phone number on your TV screen so you can decide whether to answer the call or not. To use maxTV caller ID, you need a maxTV set-top box and an HD TV with an HDMI cable.
Caller ID on TV Support

Another way to use caller ID on your TV is through Armstrong's TV service. Their caller ID feature allows you to see who's calling you on your TV screen while you're watching your favorite shows. This feature can be particularly helpful if you're expecting an important call but don't want to interrupt your viewing. To use Armstrong's TV caller ID, you need an HD TV with an HDMI cable and a set-top box from Armstrong.
Fios Caller Id On Computer
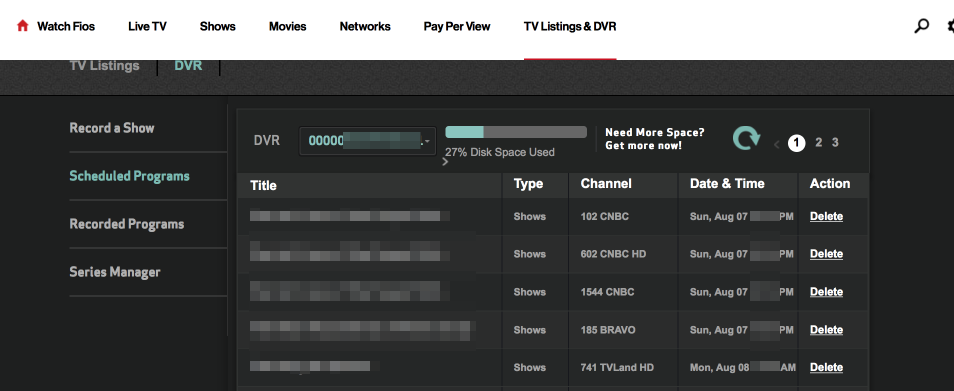
If you're a Verizon Fios customer, you can use their enhanced caller ID service on your computer to see who's calling you before you answer the phone. This feature displays the caller's name and phone number on your computer screen, and it even shows you the time and date of the call. To use Fios caller ID on your computer, you need to download the Fios app and sign in with your Verizon account.
As you can see, there are many ways to block your caller ID or use advanced caller ID features to identify who's calling you. Whether you prefer to block your caller ID altogether or just want to see who's calling you without interrupting your TV viewing or computer work, there's a solution for you. Just choose the option that works best for your needs and enjoy the peace of mind that comes with knowing who's on the other end of the line.
Caller maxtv using sasktel support ll call log history. Fios caller id on computer fios smile citrus the caller id on their. Caller id on tv follow the wire. Caller id for android apk download. Fios caller id on computer fios smile citrus the caller id on their. Caller id for uverse voice and tv at&t uverse tv support. Caller id on tv support armstrong
If you are searching about Fios caller id on computer fios smile citrus the caller id on their, you've came to the right page. We have pictures like Fios caller id on computer fios smile citrus the caller id on their, the ultimate phone gadgets caller id, internet call waiting, telezapper, fios caller id on computer fios smile citrus the caller id on their. Here it is:
How to block caller id, how to hide your caller id when making a phone call on iphone
Also read:
- How To Add Your Real Signature In Word
- How To Factory Reset Iphone But Keep
- How To Print Screen On Mac Using Remote
How to add your real signature in the cell, how to add your real signature maker, how to add your real signature baseball, how to add your real signature fonts, how to add your real life, how to add your business to google, how to add your music to spotify, how to add shortcut to chrome homepage, how to add signature to pdf, how to draw, how to lower blood pressure, how to get free robux,
Adding a signature to your word documents is a perfect way to personalize them and make them look more professional. Signatures can be used to indicate ownership, add contact details, or even just to give your documents a personal touch. With the many ways to add a signature in Word, you'll never have to worry about leaving your documents without one. Here's how to add a signature in Word:
1. Using the Signature Line Feature
The signature line feature is the most preferred way to add signatures to Word documents. With this feature, you can create a digital signature that looks similar to the traditional handwritten signature. Follow these steps to add a signature line:
- Click on the location where you want to add the signature line.
- Click on the "Insert" tab on the menu bar.
- Click on "Signature Line" in the "Text" group.
- Enter your preferred signature details in the fields displayed.
- Click on "OK" to add your signature line.
After the signature line is added, you can sign it by typing or drawing your signature using a touchscreen device or a mouse.
2. Creating a Signature Using the Drawing Tool
If you prefer a more personalized signature, you can create your signature using the drawing tool. Follow these steps:
- Click on "Insert" on the menu bar.
- Click on "Shapes" in the "Illustrations" group.
- Select a line or shape to use as your signature.
- Draw your signature using the selected shape or line.
- Format your signature in the "Shape Styles" group.
- Once you're satisfied with your signature, save it as a picture and then insert it where you want it to appear in your document.
3. Using a Scanned Image
If you have a scanned image of your signature, you can easily insert it into your word document. Follow these steps:
- Click on the location where you want your signature to appear.
- Click on the "Insert" tab on the menu bar.
- Click on "Pictures" in the "Illustrations" group.
- Select the scanned image of your signature and click on "Insert".
- You can resize the image and position it where you want it to appear in your document.
Adding a signature to your word document is a quick and easy process. You can choose to go for a digital signature, draw your signature using the drawing tool or use a scanned image of your signature.
Conclusion
Adding a signature to your word document is a great way to make your documents more personal and professional. With the many ways to add your signature, you can create a personalized signature that is unique to you. Try out any of the options above and take your documents to the next level.
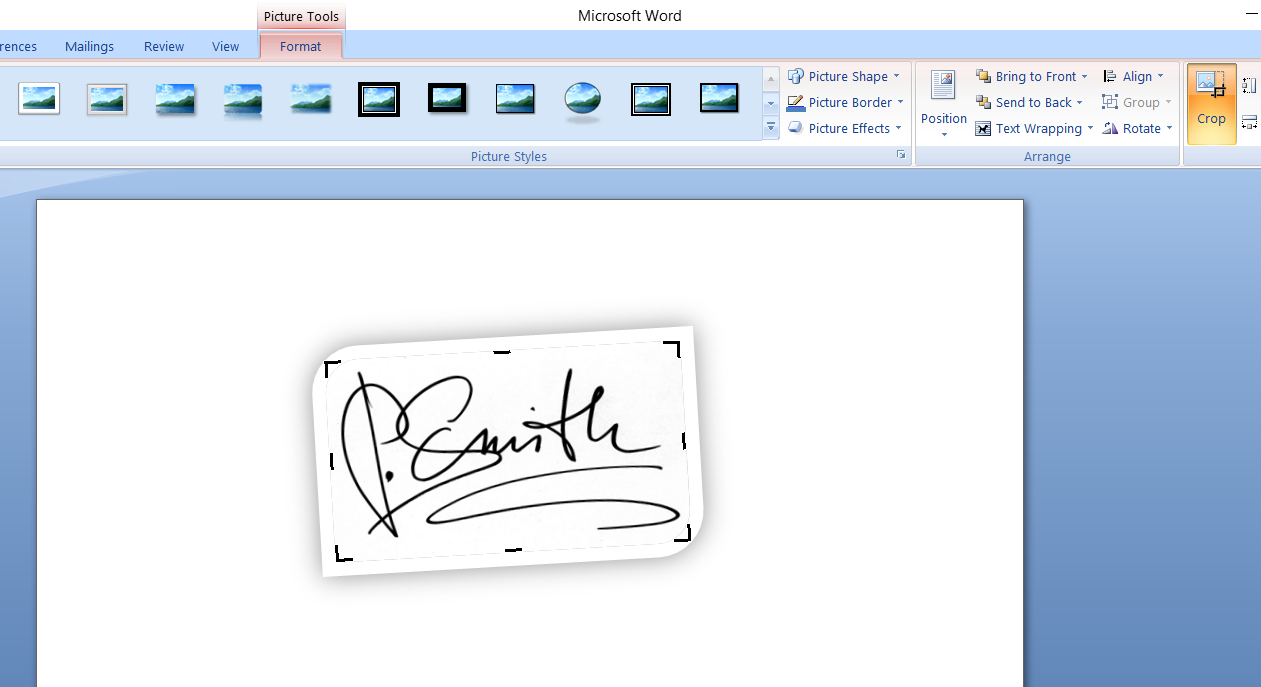
Image source: alivetalk.com
Also read:
.How to do an iphone factory reset, can you factory reset a locked iphone, how to factory reset pc, how to factory reset ipad, how to factory reset iphone without password, how to factory reset ipad, how to factory reset samsung phone, how to print screen, how to write a cover letter,
Are you tired of your iPhone functioning at a snail's pace? Do you dread the thought of deleting everything on it in order to start fresh? Fear not, technophiles, because there are a plethora of ways to reset your iPhone with ease and restore it to its former glory.
Method 1: Factory Reset Your iPhone
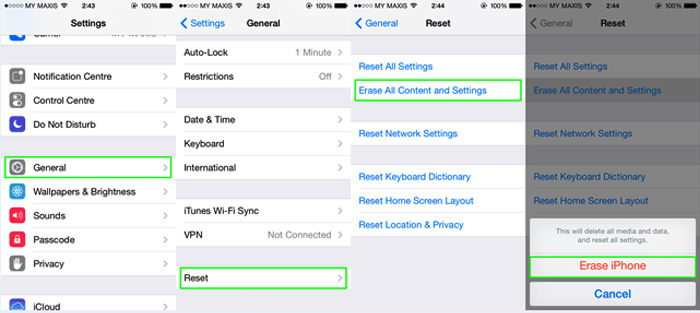
The first method to factory reset your iPhone is an extreme measure but it can solve many issues if your device is not working correctly. When you perform a factory reset, all apps, data, and settings get erased from your iPhone. This method is also useful if you're planning to sell your phone or pass it on to someone else.
To factory reset your iPhone, go to Settings -> General -> Reset -> Erase All Content and Settings. You will be prompted to enter your passcode and, once the process has begun, it may take a few minutes to complete. Be sure to backup your iPhone before performing this action.
Method 2: Hard Reset Your iPhone

If your iPhone is frozen or unresponsive, a hard reset can be the answer to your problem. To perform a hard reset on an iPhone 8 or newer, press the Volume Up button quickly followed by the Volume Down button. Then, press and hold the Side button until the Apple logo appears. If you have an iPhone 7 or older, press the Home button and the Power button at the same time until the Apple logo appears.
Method 3: DFU Mode

If you're looking to restore your iPhone to its original settings, DFU (Device Firmware Update) mode may be your best option. DFU mode is where your iPhone can communicate with iTunes, but it doesn't load the operating system or boot loader. This allows you to restore your iPhone using a previously downloaded firmware file or to update your iPhone to the latest version of iOS.
To enter DFU mode on your iPhone, connect it to a computer and open iTunes. Press and hold the Side button and Volume Down button for eight seconds, then release the Side button while continuing to hold the Volume Down button. If you have an iPhone 7 or older, hold down the Home button instead of the Volume Down button.
Method 4: Recovery Mode

Recovery mode is similar to DFU mode, but instead of restoring your iPhone with a firmware file, it updates your iPhone with the latest version of iOS. If your iPhone is stuck on the Apple logo, in a boot loop, or is displaying the connect to iTunes symbol, recovery mode may be the solution to your problem.
To enter recovery mode, connect your iPhone to a computer and open iTunes. Press and hold the Side button and Volume Down button for eight seconds, then release the Side button while continuing to hold the Volume Down button. If you have an iPhone 7 or older, hold down the Home button instead of the Volume Down button.
We hope this guide has cleared things up for you. Remember, when in doubt, consult with a professional or refer to Apple's official support page. Happy resetting!
Also read:
.Print screen in windows 10 using mac keyboard, print screen on windows using mac keyboard, print screen windows 10 using mac, how to print screen on mac pro, how to print screen on laptop, how to print screen one monitor, how to print, how to print labels in word,
If you are a proud owner of a Mac device, you already know that it offers a seamless user experience that is hard to match. However, as with any device, you may encounter situations where you need to print screen on Mac. Whether it's for creating documentation, troubleshooting, or for personal reference, it's a handy feature to have at your disposal.
There are several methods to capture screenshots on Mac, and we are going to take a deep dive into each of them. So settle in and let's get started.
Method 1 – Using Keyboard Shortcuts
One of the easiest and quickest ways to print screen on Mac is by utilizing keyboard shortcuts. Here's the method:
- Press and hold down the Command + Shift + 3 keys simultaneously.
- You will hear a sound like a camera shutter along with an instant preview of the captured image on the bottom-right corner of your screen.
- The screenshot will be saved automatically on your desktop with the name 'Screenshot date at time.png.'
It's that easy. However, if you want more control over the screenshot, check out method 2.
Method 2 – Using Keyboard Shortcuts with Annotations
If you want more control over the screenshot, you can use the keyboard shortcuts with annotations. Here's how:
- Press and hold down the Command + Shift + 4 keys simultaneously.
- Your cursor will turn into a crosshair cursor.
- Click and drag the crosshair cursor to capture the portion of the screen you want to capture.
- Once you release the cursor, you will hear the camera shutter sound, and the screenshot preview will appear on the bottom-right corner of your screen.
- You will also see a toolbar with annotation options such as text, shapes, lines, and color in the upper-right corner of your screen.
- Select an annotation option to edit the screenshot as needed.
- Once you are satisfied with the screenshot, click on the 'Save' button on the toolbar to save the screenshot on your desktop.
This method offers a much more customized experience and gives you more control over the screenshot. However, sometimes you may want to capture a window rather than the whole screen. For that, check out method 3.
Method 3 – Using Keyboard Shortcuts to Capture Window or Menu
Sometimes capturing the entire screen may not be required, and you may want to save only a particular window or a menu. Here's how to do that:
- Press and hold down the Command + Shift + 4 + Space keys simultaneously.
- The cursor will change to a camera icon.
- Hover over the window or menu that you want to capture.
- Click on the window or menu to capture the screenshot.
- The camera shutter sound effect will play, and the preview will appear on the bottom-right corner of your screen.
- Click on the 'Save' button on the toolbar to save the screenshot on your desktop.
This method saves you time by capturing only the window or menu that you need to share or save. However, what if you want to take a screenshot of an entire webpage? Check out method 4.
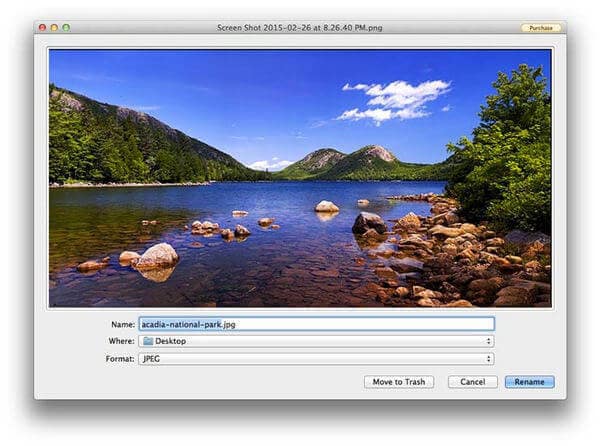
Method 4 – Using Screenshot Utility for Entire Webpages
You can use the Screenshot utility to capture full web pages, including the part that is not visible on the screen. Here's how:
- Open the webpage that you want to capture.
- Press and hold down the Command + Shift + 5 keys simultaneously to open the Screenshot utility.
- Click on the 'Capture Entire Screen' or 'Capture Selected Window' option.
- If you select the 'Capture Selected Window' option, hover over the window that you want to capture.
- Click to capture the screenshot.
- If you choose the 'Capture Entire Screen' option, you will get a 5-second timer to adjust the webpage display before capturing the screenshot.
- The preview will appear, allowing you to add annotations or crop as needed.
- Click on the 'Save' button on the toolbar to save the screenshot on your desktop.
This method is particularly useful for bloggers, designers, or web developers who need to capture full web pages for documentation purposes. And, speaking of customization, what if you want to change the destination folder of your screenshots? Check out method 5.
Method 5 – Changing the Destination Folder for Screenshots
By default, your Mac saves the screenshots on the desktop. However, you may want to save them in another location for easier access or organization. Here's how:
- Open Terminal.
- Type in 'defaults write com.apple.screencapture location' in the terminal without the quotes.
- Enter the path to the location where you want to save your screenshots, followed by hitting the Return key.
- Restart your Mac for the changes to take effect.
This method is useful for people who like to keep their desktop free from clutter or need to organize their screenshots into custom folders.
Conclusion
Capturing screenshots on a Mac is a simple and straightforward process, regardless of the method you choose. However, each method has its advantages, and you can choose the one that suits your needs best. Whether it's keyboard shortcuts or using the Screenshot utility, we hope this guide has been helpful to you. Happy capturing!
Print Screen on Mac
Capturing screenshots on a Mac is an incredibly useful feature, but it can sometimes be confusing. With a range of methods to capture screenshots, it's important to know which one is appropriate for your needs. This guide has covered five different methods that will help you capture screenshots on your Mac device. From basic keyboard shortcuts to the Screenshot utility, you are now equipped with the knowledge to capture a screenshot of almost anything on your screen. So go ahead, and capture away!
Also read:
.How to say happy ramadan, how to tell someone happy ramadan, how to wish happy ramadan, how to wish a muslim a happy ramadan, how to happy in life, how to happy birthday on fondant, how to happy new year in chinese, how to happy hour fundraiser, how to happy mod, how to take a screenshot, how to pronounce, how to delete facebook account,
The holy month of Ramadan is a time of peace, reflection, and self-sacrifice for Muslims worldwide. During this time, Muslims observe fasting from dawn to dusk, giving up food and drink during daylight hours, as well as other earthly pleasures, in order to focus on prayer, charity, and spiritual reflection. This year, Muslims around the world will begin the month of Ramadan on the evening of April 12th.
Happy Ramadan Kareem 2020
As we prepare to enter this blessed time, it's important to take a moment to reflect on the beauty of Ramadan and all that it represents. Ramadan is a time for self-discipline, sacrifice, and spiritual growth. It is a time to give to those in need and to strengthen our bonds with family and friends.

During Ramadan, Muslims are encouraged to read the Quran and perform extra prayers, to engage in acts of charity and kindness towards others, and to reflect on the significance of their faith and their connection to the world around them.
While the month of Ramadan can be a physically and emotionally challenging time, it is also an incredible opportunity for spiritual growth and connection. By coming together as a community, supporting one another, and focusing on what truly matters, Muslims around the world are able to deepen their faith and strengthen their resolve.
Wishing you a blessed and happy Ramadan!
As we begin this holy month, let us take a moment to reflect on what this time means to us, and to set our intentions for the days ahead. Let us strive to be our best selves, to show compassion and kindness to others, and to lift up those in need.

May this Ramadan be a time of peace, reflection, and growth for us all. Wishing you a blessed and happy Ramadan!
As we navigate the challenges of the world around us, let us hold fast to our faith and the hope it brings. Through our prayers, our good deeds, and our commitment to living out our values, we can make a positive impact on the world around us and bring light and hope to those in need.
May this Ramadan be a time of renewal and rejuvenation for all of us. May we emerge from this month stronger, wiser, and more connected to our faith and to each other. And may we continue to carry the lesson of Ramadan with us throughout the year, striving to be our best selves and to make a positive impact in the world around us.
Also read:
.How to get away with a murderer killed lila downs, how to get away with murder season 7, how to get rid of yahoo on google chrome, how to get rid of bed bugs, how to lower blood pressure, how to screenshot on windows, how to take a screenshot, how to get free robux,
When it comes to the hit television series How to Get Away With Murder, fans cannot help but be captivated by the intense and dramatic storyline. One of the most talked about characters in the show is Lila Stangard, who has caused quite a stir among the cast and fans alike.
Who is Lila Stangard?

Lila Stangard is the student who was murdered in the first season of the show, and she has continued to play a crucial role in the storyline throughout the series. Her character was portrayed as the mistress of one of the main characters, Sam Keating, who was later revealed to be responsible for her death.
However, there is much more to Lila Stangard's character than just the role she played in the murder mystery. She was an ambitious and intelligent young woman who had dreams of becoming a successful businesswoman. Her aspirations were cut short by her untimely death, but her memory and impact on the show continue to be felt to this day.
Could Rebecca have actually killed Lila?

The question on everyone's mind is whether or not Rebecca, one of the main characters, could have actually killed Lila. There are several factors to consider when examining this question, such as Rebecca's relationship with Lila and her possible motives for committing the crime.
Rebecca had a rocky relationship with Lila, which was evident in the way the two interacted on the show. There were moments of tension and conflict between them, leading some to believe that Rebecca could have had a motive for killing Lila.
Another aspect to consider is the evidence presented throughout the series that points to Sam Keating being the killer. While Rebecca's potential involvement cannot be ruled out entirely, it seems increasingly unlikely as the evidence against Sam builds.
In Conclusion
Overall, the character of Lila Stangard has had a significant impact on the storyline of How to Get Away With Murder, and her memory continues to be felt throughout the series. While the question of Rebecca's potential involvement in her murder remains unanswered, the evidence points towards Sam Keating being responsible for her death.
As the show continues to captivate audiences, it is clear that Lila's character will continue to play a crucial role in the storyline, and fans will undoubtedly be on the edge of their seats as the mystery unfolds.
Also read:
.Galaxy s10 vs s9 plus, galaxy s10 vs s10e, galaxy s10 vs s9, galaxy s10 vs s20 fe, galaxy s10 specs, galaxy s10 5g, galaxy s10 phone case, galaxy s10 vs s23, galaxy s10 vs s22,
The Samsung Galaxy series has been a staple in the world of smartphones for years, and the latest iteration - the Galaxy S10 - has been causing quite a stir amongst tech enthusiasts. But with the Galaxy S9 still being a popular choice, many are wondering whether it's worth upgrading to the newer model. Let's take a closer look at the differences between these two smartphones.
Galaxy S9 vs Galaxy S10
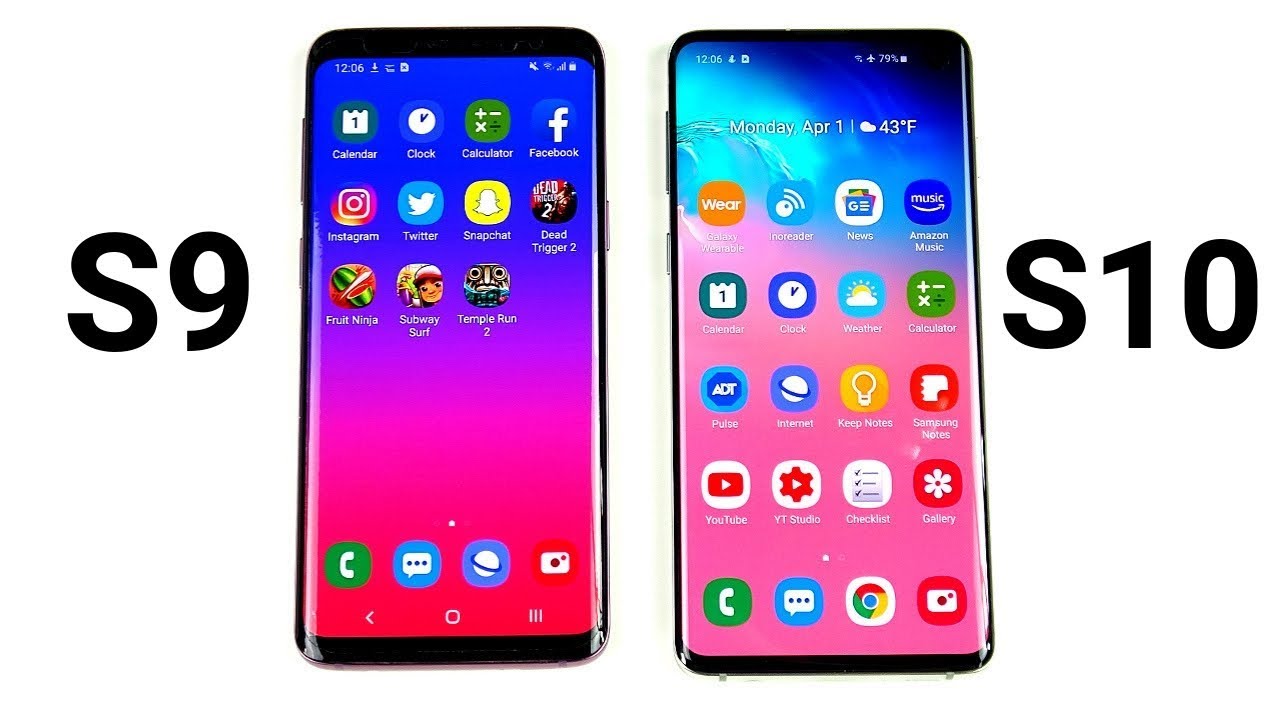
The Galaxy S10 is definitely an upgrade from the S9 in terms of design. It boasts a 6.1-inch Quad HD+ display, compared to the S9's 5.8-inch one. The S10 also has an edge to edge display, with a punch-hole camera on the top right corner of the screen. This creates a more immersive viewing experience, making the Galaxy S10 an ideal choice for gamers and movie lovers.
The camera system on the S10 has also been improved. It has a triple-camera system comprised of a wide, ultra-wide and telephoto lens - this makes it much more versatile than the S9's single-lens camera. The S10 is also capable of shooting HDR10+ video, which produces eye-catching results. The S9 does offer a great camera experience, but if you're looking for an upgrade in camera quality, the S10 might be the way to go.
Samsung Galaxy S10 vs S9 vs S8 Worth the upgrade?

If you're using an S8, then upgrading to the S10 makes a lot of sense. The S10 offers a lot of new features and improvements that the S8 simply doesn't have. However, if you're already using an S9, the upgrade might not be as necessary. The S9 still holds up well and offers a similar experience, so it really depends on what you're looking for in a smartphone.
One key difference between the S9 and S10 is the fingerprint scanner. The S10's scanner is located under the screen, which is a futuristic touch that the S9 doesn't have. The S9's scanner is on the back of the phone, which some might find more intuitive. It really comes down to personal preference, but if you're looking for something new and innovative, the S10's scanner might be worth the upgrade.
Samsung Galaxy S9 Vs Galaxy S10 What's new about the S series? – Techjaja

The S10 comes equipped with the latest Snapdragon 855 processor, which is a big upgrade from the S9's Snapdragon 845. This means that the S10 is a lot faster and more powerful than the S9, making it perfect for running intensive apps and games. The S10 also has a larger battery compared to the S9, which means you'll get more screen time between charges.
If you're someone who loves to multitask, the S10 also comes with up to 12GB of RAM - a massive improvement from the S9's 4GB. This makes the S10 much more efficient at running multiple apps at once without any lag.
Compare between Samsung Galaxy S10 Plus vs Note 9 vs S9 Plus
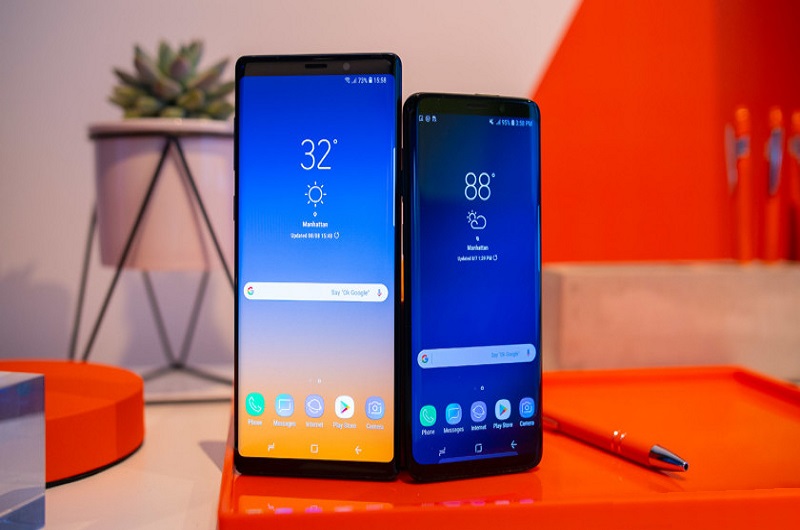
If you're still uncertain about upgrading to the S10, it might be helpful to compare it to its predecessors. The S10 Plus has a larger display and battery than the S10, making it more suited for power users. The Note 9 also has a larger display and battery, and comes with the Samsung S Pen, which is perfect for note-taking and sketching. The S9 Plus is still a great smartphone, but falls short when compared to the S10's new features.
Overall, whether you decide to upgrade to the Galaxy S10 from the S9 or not really depends on what you're looking for in a smartphone. If you're someone who wants the latest technology and features, then the S10 is definitely worth the upgrade. But if you don't mind sticking with your current smartphone, there's no need to rush into buying a new one.
Which one do you think is better? Share your thoughts in the comments section below.
Galaxy s10 vs. galaxy s9 should you upgrade? android central. S10 lint trudiogmor gearopen. S9 vs samsung s10 galaxy comparison colorfy update different phonearena specs. Galaxy s9 vs galaxy s10! youtube. Galaxy vs s10 s9 plus samsung screen display phone difference aspects purchase important days any most these. S10 galaxy samsung malware s9 plus vs ad ups pop other remove. S10 s9 galaxy upgrade conviene differenze androidcentral
If you are searching about Samsung galaxy s10 vs samsung galaxy s9 trusted reviews, you've came to the right web. We have pics like Samsung galaxy s10 vs s9 comparatif et différences majeures, s10 vs s9 plus speed test samsung galaxy s9, samsung galaxy, speed test, samsung galaxy s10 plus vs s9 plus speed test! youtube. Read more:
